Sunday, October 20, 2013

Pyrex Love

I have a confession to make. Hi, my name is Elizabeth. And I'm addicted to collecting Pyrex.


ADDICTED. It's a good thing that I live in a rather secluded area where I can hit up the local antique stores in one day only, because had this obsession progressed the way it has recently when I was still in California, I'd be cruising Craigslist/Goodwills/Antique Stores daily.

I don't think people understand the obsession until you start collecting. How I started collecting was by frequenting the Long Beach Antique Flea Market, or as my family calls it, "the sale." The sale is amazing, it has anything and everything, and even a tranny or two. I think that sale has been going on for years, but I only started going to it about a year before I moved away from California. I miss that sale so much because it was a fun time for my family. We all went together, laughed, made fun of people and the things they were selling and got some good stuff and some great deals. After frequenting the sale multiple times, I kept seeing the same sort of dishes. I was originally attracted to the teal and white dishes, and after a few times of seeing them, I finally made my first purchase. The first dish I ever  bought was a divided snowflake blue casserole dish. I made my first purchase and couldn't stop. I started googling, searching, and wanted all the blue Pyrex.

After that initial purchase, the rest of history, as you can see below.

Pyrex Numbers

All Pyrex bowls have numbers on the bottom of them. There will be a three digit number that classifies what it is, then it will also have what size (quarts, pints.) I completely ignore the sizing. I do not pay attention to it, I don't do sizing, it's SO much easier to look at what the three digit numbers are.

So.

Cinderella bowls will ALL start with the first two numbers being 44. The smallest mixing bowl will be classified as 1, then the second smallest one will be classified 2. So - the smallest Cinderella mixing bowl, of any print, will have on the bottom of it 441. This is how I know what I am missing. A full set of Cinderella bowls will be 441, 442, 443, 444.

The regular mixing bowls (with no handles) have the same sort of system, but start with 40, so 401, 402, 403, 404.

How I started figuring out what I was missing was creeping the website: Pyrex Love.  I go on this website, find the print I have, and then start checking numbers and making a list of what I have.

In order to help myself when I shop, I'm creating a list of everything I have here, and to also help anyone who wants to start collecting. I don't do math, and for some reason, the numbering system confused me.

Butterfly Gold 
1960s - 1970s

What I have:
Cinderella Mixing Bowl 441, 442
Mixing Bowls - 401, 402, 403, 404
Refrigerator Dishes 501, 502, 503
Loaf Dish 913 (this dish isn't supposed to have a lid)
Butter Dish - 72
Coffee Cups - 39
Casserole - 043 (not sure where this one belongs)
Cinderella Bake Serve Store Casserole Dishes - 471, 472, 473
Round Casserole Set - 475 (missing lid)
Margerine Holder - 75
Salt & Pepper Shakers 
Correlle Pitcher 


What I am Missing:
Cinderella Mixing Bowl 443, 444
Quart Round Casserole 664
8 Inch Baking Dish - 922
Cinderella Oval Casserole Dishes - 943, 945
Cinderella Oval Divided Dish - 963
Oblong Baking Pan - 933
Round Casserole Set - 474, 474, 475 (lid only)

I wrote this post literally three weeks ago, and haven't uploaded it until today, so there have been some additions!


Pyrex Primary Colors
1940s

Complete set!
Mixing Bowls - 401, 402, 403, 404
Refrigerator Dishes - 501, 502, 503
*This set should have the lids that have spacing in the middle. It shouldn't be lined completely.

Butterprint - Teal
1957
What I have:
Cinderella Bake and Serve Casseroles - 473
Cinderella Mixing Bowls - 441, 442, 443, 444
Mixing Bowl - 403
Refrigerator Dishes - 501, 502, 503
Refrigerator Dishes 502, 503
Round Casseroles - 473 (this number is found in 2 sets)


What I missing:
Cinderella Bake and Serve Store Casserole - 471 (white on turq & reverse), 472 (only white on turq), 473 (white on turq, but was offered both colors)
Turquoise Butter Dish - 32
Mixing Bowls 401, 402, 404
Refrigerator Dish - 501
Round Casseroles - 475

The entire Butterprint collection is:
Cinderella Bowls - 441, 442, 443, 444 (should alternate colors)
Mixing Bowls - 401, 402, 403, 404 (only in white)
Butter Dish - 32
Refrigerator Dishes - 501, 502, 503
Cinderella Bake and Serve Casserole Set - 471 (offered turq on white, and reverse), 472 (only white on turq), 473 (offered turq on white and reverse)
Round Casseroles - 473, 474, 475

Snowflake 
1957


Square Flowers
What I have:
Cinderella Round Casseroles 474, 475
Cinderella Oval Casserole Dish 973
Mixing Bowls 401, 402, 403, 404

What I am missing:
Cinderella Round Casseroles 474

Mushroom Print

I'm not collecting these ones, they were actually free with another purchase : ) 


Pink Daisy

What a horrible picture, I found this pink dish for cheap, and although I don't have anything pink, I do have an obsession with the divided dishes.


And here is the wholeeeeeeeeeee cabinet : ) 


Wednesday, September 18, 2013

Starbucks Chalkboards

Did you know I work? From emails I've been receiving from people, or comments about how I just have so much time to work on things, I don't think people realize that I work, go to school full time, and craft like a crazy lady. I make time to make beautiful things, because it's what I love.

Moving on...Where I work we have a Starbucks. I'm pretty sure you can all guess where I work,  but when I was hired I had to sign a piece of paper stating I will not talk about my job on social media because I'm Human Resources. Weird, right? So, I'm not stating where I work, I'm just talking about a sign that I made. Evasive right? ;)

Anyways, HR jobs are glorified interior decorator jobs. Replace table cloths, have pretty writing, write peoples names elegantly on various items. Seeing as how I loooooovvvvveeee chalkboards and writing, the Starbucks girls propositioned me to do their chalkboards for them.

Hi. My name is Elizabeth, and at one point, I was addicted to Starbucks. I went to Starbucks everyday for 2 years. True story. Anyways, I always loved to look at their chalkboards and wonder who the hell did them because they were fabulous. Well. Here is their secret! You receive a sort of planner that tells you what to put, and you're not supposed to deviate from the plan. Sad, right?

So, the Starbucks girl gave me this paper, and a chalkboard and I had to create. The pumpkin spice latte is actually cardboard and on a magnet, and so is the wording. So I had to recreate this below on a chalkboard...

The reference guide

I've mentioned before that I can pretty much copy anything. When I said that, I meant copy writing. Drawing, eh... The wording turned out cute I thought, but the drinks, they left a little something to be desired... I also did a little free styling because I just HAD to. Overall, I think it looks pretty good!


Anyways, fast forward to yesterday. I walked into the store and found that my chalkboard was down and missing in action. Nicholas Sparks was here signing copies of his new book, and they wanted to promote the book signing. I had to erase all my hard work and I had twenty minutes to come up with something. I do not create quickly, so I had a mild anxiety attack over a chalkboard. It could have been better, especially the drink names at the bottom, but I was in a time crunch! I was the happiest with how I wrote his name. I hope Nicky sees it and starts thinking about using this way to write his name in books! ;)

PS. That is some of Starbucks secret menu and it's DELICIOUS!


I saw one of his publishing agents take a picture of it and told me she was sending it to New York. I asked her if she was posting it online, and she said yes. She was from Grand Central Publishing, and they put it on Instagram and Twitter. I should have asked her to tag me! ;)


And on twitter! :) 


Unfortunately, I didn't accomplish my goal of getting a picture of me twerking behind Nicholas Sparks. But, luckily,  he lives here in New Bern, so there's always another day.


Tomorrow I get to erase the Nicholas Sparks chalkboard and create the pumpkin spice latte one, again! Wish me luck a second time around!

Sunday, September 8, 2013

I'm not a witch at all - Chalkboard Tutorial

Chalkboards are everywhere right now, and seeing as how I have an obsessive personality, I've started creating them and writing on them in mass quantities. If you remember from this post my dear seester put me to work when I went out to visit my family earlier last month. I should actually thank her for forcing me because she sparked my crafting bug once again!

Anyways, I've been googling, researching like crazy how these people do their chalkboards, and I've learned a lot these past few days. I thought that these people were just coming up with their own fonts, and creating like crazy. I'm sure there are people that do, but I need something to go off of.

Want to create this?


Here is what I did!
1. I went to dafont.com
2. I searched for a font, I know one that I like to use - it's called "chalk hand lettering"
3. I searched and selected "CHL" and then typed the word that I wanted, in this case it was "good witch" and "bad witch"
4. I took a screen shot of each word, so I did a screen shot of "good" and one of "witch."
5. I opened a word document and inserted my screen shot into the document.
6. I enlarged the picture and printed out the document to use as a reference guide.

Unfortunately, I do not do the thing where you can shade the letters with chalk, and then press it against the board like in this tutorial. I just don't want to waste ink, and I'll be narcissistic for a hot minute, my hand writing isn't too shabby.


Before I left California my sister had a friend who was getting new windows, and had all these old babies just lying around. I took all of them. I believe there were 12. Well I'm down to 8 now from various other projects, and I gave a few away.


I taped off the window completely so that none of my chalkboard paint would seep through. This is the chalkboard spray paint I use. My husband doesn't use anything besides spray paint because apparently he mastered that technique. I'm not so good, but I think that since the chalkboard spray paint is already super thick, that it was easy to use.


I just sprayed lightly back and forth, for about 3 coats. It looks like it's uneven, but it's drying!


Here are the two templates I went with. Here are the templates if you want to use the same ones. 

I also use these markers from Michaels, but the thinner tipped ones. Also, if you make a mistake, fix it right then and there or else it's a little hard to erase. This is not a project that you can come back to later, you need to do it in one sitting.

I stuck it up on my mantel where it belongs halfway through to see if I liked it or not. I wasn't too sure how great of a job I was doing.


I finished and I actually enjoy it! I wish this wasn't a two paned window, but hey. It was free. What do you want, Gidgie? I'm enjoying it and looking at it right now. I'm already thinking of what to write for Thanksgiving and having a panic attack of having to erase it and recreate it next year!

Halloween Sign Tutorial

Happy Halloween! Oh! What's that? It's only September? Well well well. Let's break it down. There are 52 days until Halloween, and yes. I am already counting. I LOVE Halloween. You have to have some serious love for this holiday to create a countdown for the neighborhood children, right? I'm excited about Halloween this year because I'm in a new house! I'm also slightly nervous. You see, back at our old house in Oceanside, our little community was like something out of a movie on Halloween. There were kids everywhere. Mobs of them, and I secretly think that kids would get dropped off in our neighborhood because the knew the lady that lived at 714 Morse was hooking kids up with candy. Last year my husband acquired some full sized candy bars from the baby recruits who go through boot camp, and I handed out full sized candy bars (we had a huge moving box full of them) and went through $100 in candy, and we had to turn our light out because we ran out! See, INTENSE!

I'm eager to see how a North Carolina Halloween compares to a California one...

My sister sent me a picture of this exact sign last month, along with the blog. See, this isn't just something you can fetch from a Hobby Lobby, I mean a Home Goods, I mean from someone on the side of the road. You've got to see this tutorial first. ;) And here is the blog of the girl who made that sign, she's adorable!

 I did things a little different than her, and I actually have the words for the stencil that you can download if you want them.

What you need:
-Wood (1x4 in this tutorial) however big you want it, you can click on the tutorial link above for more specific wood instructions
-Black, Orange, Yellow, and White Acrylic Paint
-Teeny Paint brushes
-Washi tape (to hold stencils on the wood)
-Wood Glue
-2 Chalkboards
-Printer


Step One:
The first thing I did was take advantage of the week of leave my husband had. I texted him a picture of the sign from work along with one word, "Puhlease?" and when I pulled up in front of our house 4 hours later, I found him waiting for me with our dog upfront and this bad boy. God bless him!

He used 1x4s and cut them at varying lengths and nailed them to the two long poles you see at the bottom. It was very sort of haphazardly done (I didn't share the girls tutorial with him before this, whoops!) This one was rather large, but hey, we have a big lawn. I want peeps to see this from the street.


Step Two:
Print the stencils, cut and tape to the board.

Here are the templates - it takes you to a Scribd website - totally fine!
It's all about the candy stencil
Candy Stencil
Days Countdown Stencil


Step Three:
See how it looks. If you're going to spend an insane amount of time on a project, make sure it looks fabulous beforehand! I put hay under mine to hide the legs of the sign.


Step Four:
Cut out the words. This is how I got that beautiful writing! I only freehand with chalk - paint, not so much. I cut out everything and then trace it with pencil and paint the lines with teeny brushes.


Don't forget to do those candy corns first!


Step Five:
Use wood glue to attach the chalkboards


Step Six:
Put one of your best friends in front of it to model.


Step Seven:
Question the four hours you spent making the sign, and realize that you're bad ass in that headband, like Brett Michaels.


Step Eight:
Hang out with your wang out. DISPLAY!!!!!


Please let me know if you have any questions! On a difficulty level, I'd say this is a 3. If you can cut and trace, and don't have shaky hands, it's SUPER easy!
: ) 

Sunday, September 1, 2013

I'd never named a boat before... - Oriental, North Carolina

Yesterday, I woke up and ran 4 miles through my neighborhood. I ran a slightly different route than I usually do. The next main street over from my neighborhood has horse stables. That road is the most beautiful road to run on, and it made me realize that I have not explored North Carolina enough! So I had 2 miles to run back home from the horses and think of something to do. I'd read about antique shops in a cute little town across the river  from us and decided that was where we were going to go. We could get there two different ways, drive an hour and go around to the big bridge that connects New Bern across the Neuse, or go near base and take the ferry across. We decided on the ferry.

The ferry runs every 30 minutes in both directions. We got there right at 11:40 and it was slated to leave in 5 minutes. I literally ran inside the information center for our tickets and the cutest old lady explained to me that the ferry was entirely free. FREE. Can you believe that!? It runs all day long and it's totally free? I still don't understand that...

They pack you into that ferry like a can of sardines. I had to crawl over the drivers seat to get out on the other side, which was a sight for the car next to us because my knit shorts exposed my ass as I climbed over. The old man next to us got a show for free that day!

On the ferry! 

Oriental is the "sailing capital of North Carolina" or so they say, hence the title of this post. I don't know what it is about NC that Dustin and I quote Forest Gump on the regular pretty much...


I just had to. Their fishing harbor was so neat, and the name of this boat was my favorite!!!


While googling things to do in Oriental, I found an old barn that you can go and do some picking at! If you don't know me personally, you have to understand that my husband is sort of a character. He watches American Pickers on the regular and bartering prices would probably be listed on his résumé. He was in hog heaven. While the place was fascinating. I realized that I prefer my more organized antique stores with pretty displays. This was a fun place to visit, but at times the floor creaked so much, we both thought we were going to fall through. 


See what I mean? I just wanted to organize everything! That swing in the front the owner made with a sewing machine she is selling inside! It was pretty neat!


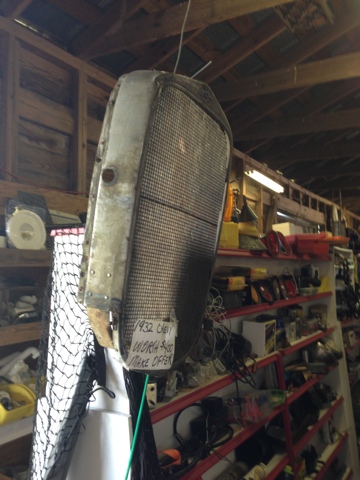
The lighting was weird, but I thought this was so neat! It's a 1932 Chevy grill (if you can't see the sign) and I thought this would be adorable in a boys room. I could see why interior decorators would love places like this - a lot of the pieces are large and expensive. 


This is the one thing I considered. The door was a little jacked on the bottom, but we realized it could easily be fixed. I thought if I cleaned this up it would be adorable on display in my kitchen with pyrex sets sitting on and in it. I might have bought it if I had a way to get it back with us. It was that perfect sea foam/mint color. 


We went to go hit up an antique store and there was a sign up that said "went to deliver some chairs down the street, be back soon. Wayne." Isn't that just hilarious!? You know, just closing my business to deliver some customers some chairs. These people here crack me up! 

Since the antique store was closed, we went to a little gas station near by and they had a cooler full of glass bottle cokes. Of course I had to have one. I prefer coke from a fountain or a glass bottle. Amazing. We then went to the water and found this lawn with adirondack chairs just hanging. I didn't take a picture of what is in front of us, but it's the water and all the sail boats were out. It was a beautiful day! 


You can see the water a bit in this picture! I just can't get over these chairs just being here! They'd get jacked in California in 5 seconds! 


One of the houses! It's Labor Day weekend so a lot of people were at their vacation homes. Aren't these houses just too cute? 


We had a lot of fun! Although we didn't buy a single thing (rare for me) it was fun exploring! 

Wednesday, August 14, 2013

Quit Slackin' and Make Shit Happen

Last week I packed up my ish, woke up at 11:30pm California time and headed out for an early flight back home. It was weird going back home because I am so used to North Carolina, that I forgot what it was like to live in California. I haven't been home for 8 months, which I cannot believe. My husband would literally go years without seeing his family, and I always thought that if I ever had the chance to hoof it cross country, I'd probably come home every 3-4 months at least. Well, now that I have a job, and I'm in school full time, and I have two pupperonis that need loving, I realize how hard that realistically is. Not to mention the $650 price tag that comes with flying from our teeny New Bern airport into Los Angeles.

Anyways, I had a grand old time. I miss my family, I miss my nephews, I miss the weather. Running every morning and not being covered in a fine layer of sweat was bizarre. I was actually cold a few mornings, and I haven't felt that for months.

My sister has had a chalkboard on her wall for a while, and she was patiently waiting for me to return home so I could decorate it for her. I've never decorated a chalkboard before ever, and I was surprised how easy it was.

I have to say, the hardest part about creating this chalkboard was finding the perfect quote. We googled and were on Pinterest for some time. We didn't want a seasonal one (which is what the majority of them were) because I don't know when I'll be going back, so I finally found a tutorial, and a free printable, and we were set! Here is the website I used to get the printable, and here is the website that I used the tutorial from.


If I had to do this all over again, I'd...

1. Do no use the chalkboard markers to create your grid. Trust me on this. Or you'll spend hours erasing the little tiny lines with a magic eraser. Use a piece of chalk to create the grid.
2. Screw the math that girl tries to explain. Take the width of your chalkboard, say it's 48", and divide is by 8 - the answer isssss SIX! So your boxes across should be 6 inches apart in the width. Then take the length, say 96" divide by 8 and you have 12. So each box should be 12 inches apart lengthwise. This makes WAY more sense to me than the math equation in that tutorial.
3. Stick to the grids! I went a little cray cray and did some free handing, and I think that the spacing is off.

And that's it! I currently have 8 windows in my garage that are screaming for me to paint them and write seasonal things on them. So I must be off. : ) 

Friday, July 19, 2013

Full Time Life

Well. I am writing this blog post as I sit in my backyard in a mismatch bikini (aztec print brazilian bottoms with a peacock halter top...) with chipped nail polish and my hair looking like a rats nest (it has not seen a brush in many many days.) Do you have that visual? Good. I'm a hot tranny mess. Actually, I'm more than a hot tranny mess because at least they put some effort into their looks.

I thought I would give you these visuals so you can see where I've been the past few months. My life consists of waking up at 5AMish and running 5 miles, working all day, then coming home and doing my homework all afternoon. These are not exaggerations, I was stretched to the max these past few weeks so much that I spent one lovely evening crying over independent and dependent variables. I'm currently taking classes to become an elementary school teacher and everyone assured me they'd be the easiest classes ever. They are pretty easy, but so time consuming. What also doesn't help is that I'm a perfectionist. To the extreme. I currently have a 99% in my science teaching class, and I was stressing over the final... I'm trying to learn how to balance things but its been so long since I've been in school full time and had to work. I love being busy, I love being stressed out (you heard me.) This stress helps me get shit done on point! So this is my first and last post bitching. You heard it! Last time! I just wanted to let you all know where I've been these past few months.

Anyways! On to some crafting! One of my girlfriends is having a bambino, and of course I had to make a baby blanket! That's my MO when it comes to babies, they all need blankets. Shit, I'm 26 and I still have one! ;)

This little bambinos madre loves Russian stacking dolls! Thank god she was so helpful picking out fabric because I have such weird taste in fabrics I'm always worried someone will hate something I make for them. So Megan! I appreciate the help! You have no idea! I bought the fabric off Etsy, it was special and made out of organic cotton so it's very soft! The backing is actually minky! It doesn't look that way because it doesn't have the raised dots, but it's minky! I mostly love the ruffles I added on! Those ruffles you can buy premade at Hobby Lobby, they come on a huge spool and are sold by the yard. I originally bought it for a skirt I've yet to make so I felt like I didn't want my money to go to waste, and used them up! 


This blanket is a little different than the ones I've made in the past for a variety of reasons...

1. No binding around the outside. My nephews had a blanket with binding and it ripped off and of course my nephew was wrapping the excess around his neck like a crazy child!

2. No inside layers! Baby blankets are meant to be thrashed. They'll be washed, spit up on, poo'd on. Everything. If you add a lining it will eventually break away and crumple up in the corners ruining your blankie.

3. Hand drew the letters. I usually print out letters, copy them, trace them, blah blah blah. I like to think I have decent handwriting so I hand drew those letters and they're perfect!

3. Ruffles! So. This blanket is made very basically in the style of sewing the right sides together and turning everything inside out and sewing it closed on one side. The first step I did was sew the ruffles in. I wish I took a picture, but I was so in the zone I couldn't stop! So how I sewed in the ruffles was by placing the side of the ruffles I wanted to show on the inside of the two right sides of fabric facing in. Does that make sense? So I placed the two right sides of fabric together, and then placed the ruffles sandwiched in the middle... I had the edge that is not ruffled sticking out the edges of the fabric. Then I sewed a straight line connecting all the fabric. Turn inside out and BAM! Beautiful! Hope this helped! :)

In other happy news! I've been hanging out with friends a lot. There were some free days where I threw my homework out the window and went straight for the beach!

We went down to Pine Knoll Shores and it's beautiful! Parking is horrible, of course, so Dustin dropped us off to go find parking. Of course I wanted maximum sun exposure so while I was waiting for him to get the car, I was sunbathing on the street! :)


This is my best friend here, who happens to have the same name as my husband. Dustin. We call him D1 because he's older, and prettier. His words! He is such a character and I swear my time in the Carolina's would be miserable without him!

Oh! And my man friend Dustin? He gone! He's in 29 Palms flying around and being masculine. He's become a crew chief, what does that mean? Yeah, I had to ask too. The helicopters don't have rear view mirrors, HA, so he sits in the back of them and let's them know if its clear to turn. I told him he's a real life wingman... He also shoots some rather large gun out the side. Sounds safe right? Ughhhh.

I've also been practicing twerking. I have video of myself but I'm much too embarrassed to show it. At work I've created a twerk team and we twerk at random times. They told me I could make a video. I'm just waiting on some ideas...

Here's me getting my twerk on in my friends gear!


I have three glorious weeks off, one of which will be in my home state of California! I'm so excited to see everyone, but most of all my nephew. Those kids are my babies! I miss them so much. Hopefully I'lll be around a bit, if not, leave me hateful comments so I come back to respond to them! :)


-Gidgie