Sunday, September 1, 2013

I'd never named a boat before... - Oriental, North Carolina

Yesterday, I woke up and ran 4 miles through my neighborhood. I ran a slightly different route than I usually do. The next main street over from my neighborhood has horse stables. That road is the most beautiful road to run on, and it made me realize that I have not explored North Carolina enough! So I had 2 miles to run back home from the horses and think of something to do. I'd read about antique shops in a cute little town across the river  from us and decided that was where we were going to go. We could get there two different ways, drive an hour and go around to the big bridge that connects New Bern across the Neuse, or go near base and take the ferry across. We decided on the ferry.

The ferry runs every 30 minutes in both directions. We got there right at 11:40 and it was slated to leave in 5 minutes. I literally ran inside the information center for our tickets and the cutest old lady explained to me that the ferry was entirely free. FREE. Can you believe that!? It runs all day long and it's totally free? I still don't understand that...

They pack you into that ferry like a can of sardines. I had to crawl over the drivers seat to get out on the other side, which was a sight for the car next to us because my knit shorts exposed my ass as I climbed over. The old man next to us got a show for free that day!

On the ferry! 

Oriental is the "sailing capital of North Carolina" or so they say, hence the title of this post. I don't know what it is about NC that Dustin and I quote Forest Gump on the regular pretty much...


I just had to. Their fishing harbor was so neat, and the name of this boat was my favorite!!!


While googling things to do in Oriental, I found an old barn that you can go and do some picking at! If you don't know me personally, you have to understand that my husband is sort of a character. He watches American Pickers on the regular and bartering prices would probably be listed on his résumé. He was in hog heaven. While the place was fascinating. I realized that I prefer my more organized antique stores with pretty displays. This was a fun place to visit, but at times the floor creaked so much, we both thought we were going to fall through. 


See what I mean? I just wanted to organize everything! That swing in the front the owner made with a sewing machine she is selling inside! It was pretty neat!


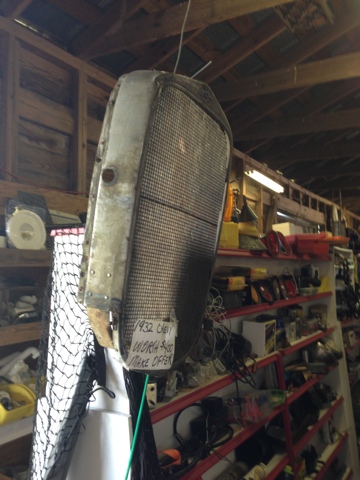
The lighting was weird, but I thought this was so neat! It's a 1932 Chevy grill (if you can't see the sign) and I thought this would be adorable in a boys room. I could see why interior decorators would love places like this - a lot of the pieces are large and expensive. 


This is the one thing I considered. The door was a little jacked on the bottom, but we realized it could easily be fixed. I thought if I cleaned this up it would be adorable on display in my kitchen with pyrex sets sitting on and in it. I might have bought it if I had a way to get it back with us. It was that perfect sea foam/mint color. 


We went to go hit up an antique store and there was a sign up that said "went to deliver some chairs down the street, be back soon. Wayne." Isn't that just hilarious!? You know, just closing my business to deliver some customers some chairs. These people here crack me up! 

Since the antique store was closed, we went to a little gas station near by and they had a cooler full of glass bottle cokes. Of course I had to have one. I prefer coke from a fountain or a glass bottle. Amazing. We then went to the water and found this lawn with adirondack chairs just hanging. I didn't take a picture of what is in front of us, but it's the water and all the sail boats were out. It was a beautiful day! 


You can see the water a bit in this picture! I just can't get over these chairs just being here! They'd get jacked in California in 5 seconds! 


One of the houses! It's Labor Day weekend so a lot of people were at their vacation homes. Aren't these houses just too cute? 


We had a lot of fun! Although we didn't buy a single thing (rare for me) it was fun exploring! 

Wednesday, August 14, 2013

Quit Slackin' and Make Shit Happen

Last week I packed up my ish, woke up at 11:30pm California time and headed out for an early flight back home. It was weird going back home because I am so used to North Carolina, that I forgot what it was like to live in California. I haven't been home for 8 months, which I cannot believe. My husband would literally go years without seeing his family, and I always thought that if I ever had the chance to hoof it cross country, I'd probably come home every 3-4 months at least. Well, now that I have a job, and I'm in school full time, and I have two pupperonis that need loving, I realize how hard that realistically is. Not to mention the $650 price tag that comes with flying from our teeny New Bern airport into Los Angeles.

Anyways, I had a grand old time. I miss my family, I miss my nephews, I miss the weather. Running every morning and not being covered in a fine layer of sweat was bizarre. I was actually cold a few mornings, and I haven't felt that for months.

My sister has had a chalkboard on her wall for a while, and she was patiently waiting for me to return home so I could decorate it for her. I've never decorated a chalkboard before ever, and I was surprised how easy it was.

I have to say, the hardest part about creating this chalkboard was finding the perfect quote. We googled and were on Pinterest for some time. We didn't want a seasonal one (which is what the majority of them were) because I don't know when I'll be going back, so I finally found a tutorial, and a free printable, and we were set! Here is the website I used to get the printable, and here is the website that I used the tutorial from.


If I had to do this all over again, I'd...

1. Do no use the chalkboard markers to create your grid. Trust me on this. Or you'll spend hours erasing the little tiny lines with a magic eraser. Use a piece of chalk to create the grid.
2. Screw the math that girl tries to explain. Take the width of your chalkboard, say it's 48", and divide is by 8 - the answer isssss SIX! So your boxes across should be 6 inches apart in the width. Then take the length, say 96" divide by 8 and you have 12. So each box should be 12 inches apart lengthwise. This makes WAY more sense to me than the math equation in that tutorial.
3. Stick to the grids! I went a little cray cray and did some free handing, and I think that the spacing is off.

And that's it! I currently have 8 windows in my garage that are screaming for me to paint them and write seasonal things on them. So I must be off. : ) 

Friday, July 19, 2013

Full Time Life

Well. I am writing this blog post as I sit in my backyard in a mismatch bikini (aztec print brazilian bottoms with a peacock halter top...) with chipped nail polish and my hair looking like a rats nest (it has not seen a brush in many many days.) Do you have that visual? Good. I'm a hot tranny mess. Actually, I'm more than a hot tranny mess because at least they put some effort into their looks.

I thought I would give you these visuals so you can see where I've been the past few months. My life consists of waking up at 5AMish and running 5 miles, working all day, then coming home and doing my homework all afternoon. These are not exaggerations, I was stretched to the max these past few weeks so much that I spent one lovely evening crying over independent and dependent variables. I'm currently taking classes to become an elementary school teacher and everyone assured me they'd be the easiest classes ever. They are pretty easy, but so time consuming. What also doesn't help is that I'm a perfectionist. To the extreme. I currently have a 99% in my science teaching class, and I was stressing over the final... I'm trying to learn how to balance things but its been so long since I've been in school full time and had to work. I love being busy, I love being stressed out (you heard me.) This stress helps me get shit done on point! So this is my first and last post bitching. You heard it! Last time! I just wanted to let you all know where I've been these past few months.

Anyways! On to some crafting! One of my girlfriends is having a bambino, and of course I had to make a baby blanket! That's my MO when it comes to babies, they all need blankets. Shit, I'm 26 and I still have one! ;)

This little bambinos madre loves Russian stacking dolls! Thank god she was so helpful picking out fabric because I have such weird taste in fabrics I'm always worried someone will hate something I make for them. So Megan! I appreciate the help! You have no idea! I bought the fabric off Etsy, it was special and made out of organic cotton so it's very soft! The backing is actually minky! It doesn't look that way because it doesn't have the raised dots, but it's minky! I mostly love the ruffles I added on! Those ruffles you can buy premade at Hobby Lobby, they come on a huge spool and are sold by the yard. I originally bought it for a skirt I've yet to make so I felt like I didn't want my money to go to waste, and used them up! 


This blanket is a little different than the ones I've made in the past for a variety of reasons...

1. No binding around the outside. My nephews had a blanket with binding and it ripped off and of course my nephew was wrapping the excess around his neck like a crazy child!

2. No inside layers! Baby blankets are meant to be thrashed. They'll be washed, spit up on, poo'd on. Everything. If you add a lining it will eventually break away and crumple up in the corners ruining your blankie.

3. Hand drew the letters. I usually print out letters, copy them, trace them, blah blah blah. I like to think I have decent handwriting so I hand drew those letters and they're perfect!

3. Ruffles! So. This blanket is made very basically in the style of sewing the right sides together and turning everything inside out and sewing it closed on one side. The first step I did was sew the ruffles in. I wish I took a picture, but I was so in the zone I couldn't stop! So how I sewed in the ruffles was by placing the side of the ruffles I wanted to show on the inside of the two right sides of fabric facing in. Does that make sense? So I placed the two right sides of fabric together, and then placed the ruffles sandwiched in the middle... I had the edge that is not ruffled sticking out the edges of the fabric. Then I sewed a straight line connecting all the fabric. Turn inside out and BAM! Beautiful! Hope this helped! :)

In other happy news! I've been hanging out with friends a lot. There were some free days where I threw my homework out the window and went straight for the beach!

We went down to Pine Knoll Shores and it's beautiful! Parking is horrible, of course, so Dustin dropped us off to go find parking. Of course I wanted maximum sun exposure so while I was waiting for him to get the car, I was sunbathing on the street! :)


This is my best friend here, who happens to have the same name as my husband. Dustin. We call him D1 because he's older, and prettier. His words! He is such a character and I swear my time in the Carolina's would be miserable without him!

Oh! And my man friend Dustin? He gone! He's in 29 Palms flying around and being masculine. He's become a crew chief, what does that mean? Yeah, I had to ask too. The helicopters don't have rear view mirrors, HA, so he sits in the back of them and let's them know if its clear to turn. I told him he's a real life wingman... He also shoots some rather large gun out the side. Sounds safe right? Ughhhh.

I've also been practicing twerking. I have video of myself but I'm much too embarrassed to show it. At work I've created a twerk team and we twerk at random times. They told me I could make a video. I'm just waiting on some ideas...

Here's me getting my twerk on in my friends gear!


I have three glorious weeks off, one of which will be in my home state of California! I'm so excited to see everyone, but most of all my nephew. Those kids are my babies! I miss them so much. Hopefully I'lll be around a bit, if not, leave me hateful comments so I come back to respond to them! :)


-Gidgie

Sunday, June 9, 2013

Moore Quilt - Finished!

A few weeks ago I posted this post about how I was going to make a quilt to donate to the victims of Moore that were affected by that horrible tornado. While the days and weeks have gone on since the tornado, many people have already forgotten about everything that happened. Well I sure didn't, I've been plugging away on this quilt for some time, working away to get it in the mail.

I emailed the Oklahoma City Modern Quilt Guild, and they sent me their mailing address so I can mail my donated quilt. I also have to include my email address on the quilt so that I can be contacted when the quilt is given away. I am so excited (and hoping) that I can get a picture of the recipient with the quilt! I made this quilt with a child in mind, and while I understand that a quilt can't replace a favorite toy that was lost, I do hope that it offers some comfort. 


Last time seeing my quilt!

How I made it...

I knew I wanted to make this quilt, but I had no idea what pattern to use or what fabrics! Luckily, my girlfriend had just given me the jelly roll pack, and had shown me the jelly roll tutorial when she was out visiting. I used this tutorial from Pinterest to make the quilt, and it sure was fun and easy to do as well! I rarely follow a pattern, I mostly just make one up in my head, but if you ever want to make a quick, fun, fast quilt, this is a great tutorial to use! For the outline of Oklahoma, I just taped together some pieces of paper, looked at a map, and drew it. I then cut it out, and traced it on some leftovers from another quilt to make the state. I then looked at a map, and placed the heart where Moore was. I applique stitched the state to the quilt top, so that thing is stuck for good, and the detailing looks great as well!

Once I finished the quilt, I added the backing and then quilted both pieces. I sewed a straight line on every other strip (if that makes any sense) so that it will hold together nicely. I also quilted for the first time with clear thread because I couldn't make up my mind what color thread to quilt with. I have to say that clear thread is hard to work with, but it's nice because it gives the blanket that quilted look without having to see the color of a thread, which is nice if you're using fabric with tons of different colors.

So that is it, it's done, gone, never to be seen again. Sounds sad right? Not to me at all, I hope whoever ends up with it enjoys it as much as I do!

: )

Wednesday, May 22, 2013

Moore needs MORE love!

I've been glued to the TV ever since Monday when the tornado happened in Oklahoma. I have a few friends that live there, and all of their updates just broke my heart. Can you imagine losing everything? I can't stop watching the footage, and as the days go on, my heart keeps breaking.

Today, as I was catching up on some blogs and some Instagram lurking, I came across this picture...

I immediately knew that no matter how busy I was, or what I had going on this weekend, I was making a quilt for this cause. I have been researching quilt donations for some time, and you'd be surprised by restrictions they have on creating one. This donation is whatever you'd like to donate. It could be a quilt you've already made, a custom one, or one you have in your home. You can find the original blog post from the OKCMQG - here 

I am so excited to start this quilt this weekend, and can't wait to put on my own personal "Anchored with love by Elizabeth" label on it, and ship it off to never be seen again. I know that sounds silly, but this truly may be one of most meaningful quilts I've ever made. : )

______________________

Here is a sneak peek at some of the fabric I am using. My best friend, Severina, introduced me to the jelly roll and an amazing tutorial, and she brought me a jelly roll when she came to visit last month. I know what you're thinking, you're giving away a quilt that you made with the fabric your best friend gave you? If you knew Sevi, you know she would get a kick out of knowing that my quilt had a huge part of her sent all the way to Oklahama. Love you Sevi!


I am so excited to use this fabric because I plan on including in my quilt, a note,  that I want this quilt to go to a child. It's going to be a smaller quilt, and  I just know a child would love the bright colors.

Stay tuned to see this quilt, I have a VERY cute Oklahoma applique stitch planned!


Sunday, May 12, 2013

Hello? Is it me you've been looking for?

I haven't been around because a few weeks ago, this man came home! He was in Florida at an Air Force base doing some training. Not sure why the Marine Corps would do training with the AF, I though the MC hated all other branches...I often like to think of the MC as the snooty branch, they think they're the toughest branch, but honestly, this picture goes against everything they stand for. This boy loves his dog, and his dog loves him back!


A few weeks ago we took a trip to Swansboro to check out a beer place Dustin had heard about. I've been on a nothing but retro kick since we've moved here... Perhaps it's the southern atmosphere that's making me think my cross country move has transported me back 6 decades. It truly is very old fashioned here, everyone waves in the neighborhood, your mail lady pays the extra 40 cents on your postage for you, and the kids are always running in the streets shouting hello as you drive by. If I could convince my family to move out his way, I'd never leave.

This was the bathroom of the beer place, I was obsessed and need to find those ceramic deer heads, oh say, yesterday. And those books on the ceiling! I die!

Thanks Trish! You're def getting a cute coffee cozy and Dunkin Donuts gift card for Christmas! 

We went to Wilmington last weekend! I wasn't too impressed with the downtown area, maybe because I'm so in love with the town I'm in? It reminded me a lot of San Diego. Like a southern SD. There were tattoo shops everywhere and felt super hipster, which I love because if I didn't want to be a teacher, I would definitely be a tattoo yielding hipster. Def. 

I've also gotten a TON of compliments on my itsy bitsy, teeny weeny, white polka dot dress, so let me just say to you. Target, girlfran! It fits amazingly too.

More of Wilmington! 

I've also been enjoying some time away from homework to tan and read. This is such a great book! I have a bestie in NC, and he let me borrow this amazing book that I highly recommend! 

The weather has turned, it's definitely humid here! It's so weird to go to the beach and be hot! There aren't too many burning hot days at the beach in California! So far I like it, but I say that now!

I haven't crafted lately. Sad face. I just haven't been inspired. Someone please help me! I have sewers block?!? Is that even such a thing? I saw so many fellow sewers at quilt market in Portland and it made me sad! I want a sewing trip with my best friends!! As soon as I get my teaching credential I am SO going!!!

Hopefully this weekend I'll get down with a craft or two. Happy Memorial Day y'all!


Friday, May 3, 2013

DIY - Easy Dress, NO Pattern! In 40 minutes!

Let me start off by telling you one thing...I'm a dress girl. Before you start thinking "this bitch..." let me explain to you why. I'm not a heels and girly girl dress type, I like simple dresses because they're easy. It's so much easier to grab a dress out of my closet and go, than to mix and match outfits. I've been wanting to dive into the dress making scene for a while, but I was too scared to make some sort of abomination of couture! I've made a ton of skirts, but those require matching tops, and ain't no body got time fo' that!

I decided to make the leap, and only had about 1.5 yards of fabric, but I did it! I made my first dress.

Here is the first one I made...in 40 minutes! Seriously. Severina is my witness, I cranked this bad boy out!

After my first attempt, and realizing that it wasn't an epic fail. I wanted to try something a little more difficult, and decided to make a tutorial while I sewed it.

Easy DIY Dress, No Pattern! In 40 minutes! : ) 
Supplies Needed:
-*1.5 yards of heavy jersey knit fabric (the heavier, the better!)
-*1 yard of lace (if you want to make a lace one like my dress)
-Coordinating thread
-Measuring tape
-Pins
-Good Scissors
-Sewing Machine
-Optional - Hug snug

*Supplies are based on my 5'3ish frame
Step 1:
-Find your dress! Look for a dress with simple lines, not very many seams, and no zipper! We are making a dress out of jersey material, that should be very easy to pull over your head.
-This is a simple dress that I've had forever, it's just a basic Roxy one with a very high waist. I replicated this dress exactly in the floral print, but decided to make it a little more low waisted for my lace dress.


Step 2A: Plan and cut out the bottom part of your dress (I will call this the skirt for the rest of the tutorial)
-I folded the top of the dress down, and cut 1 inch around the entire outside
-Follow the natural seams of the skirt

Step 2B: Cut out 2 skirt bottoms
-I always cut one piece from the "pattern" and then cut the second piece from the piece I already cut out, I do not like to work with lots of fabric when it comes to cutting, so this is my way of not letting the jersey knit get to me.

Step 3: Creating your dress top
-I laid the dress top on the fabric and cut 1 inch around the entire top piece
-How long you want your dress top to be is up to you. You may be happy with an empire waist, or a lower waist, just measure yourself and give it a shot. You can always make things shorter, but NOT longer. Remember that!

Step 4 - Part A
-Fixing your dress top
-If you tend to cut fabric like me and Helen Keller, you'll have jagged lines. As you can see in this picture, my sides are uneven, and I wanted to fix this.

Step 4 - Part B
-Fold over your top in half, and cut around the sides to even out your top
-Remember, fabric moves, and shifts, and you'll never get two perfect anythings, ever!

Step 5:
-Cut another top from the one you already created. You should have two tops and two bottoms by now

It's starting to look like a dress!

Step Six: Lace 
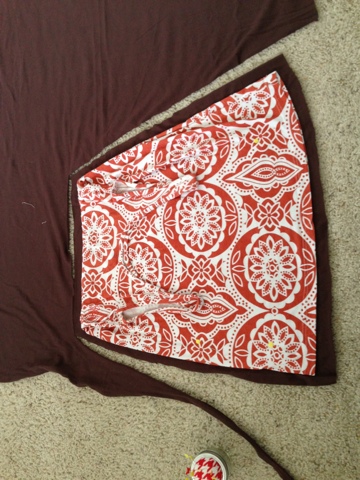
-Technically the brown part of this dress was my lining, pin your skirt lining to the lace, and cut out two skirt pieces of lace
-You don't need the lace if you don't want it, you can skip all the lace steps if you want to : )


Step 7 - Option A
-I took a sewing class once, and made a custom fitted skirt, and my teacher raved about hug snug. We used it for the hems in our skirts, but I have something outrageous like 300 yards of it, so I've been using it randomly on other projects.
-If you want to, and you definitely don't have to, but I used it to create a more finished looking seam on my top. I only did this on the brown dress, the cute floral jersey one doesn't have this at all. I was merely experimenting, but you can see how I constructed my top with this hug snug
- I found that the top laid flatter with the hug snug, but honestly, unless you plan on making a ton of dresses, I'd totally skip the hug snug!
Step 7 - Option B
-Fold over your fabric 1/4" and zig zag stitch around the neck of the top and the sleeves, but NOT down the sides
-Do this for the 2 tops
Step 8: Strap time!
-You should now have two tops with beautiful seams on the sides of the sleeves and the neck
-Let's sew the straps of the dress together at the top
-With the RIGHT sides facing each other, sew a straight line across the straps, cut off the extra material


Cut off those extra pieces at the top!

You should now have an adult bib, with the sides open

Step 9: Side seams
-With the right sides of the top facing each other, sew a 1/4" seam down the sides of the top
-You should continue down near the armpit/sleeve of the dress until the bottom
-You can do this a few times to get the look that you want, if you want a more fitted look, sew at an angle slightly going in towards the bottom


You should have a glorified crop top now!

Step 10 - Attaching the lace to the lining
-Pin the lining to the lace
-Sew down the sides of the skirt on both sides to attach the lace to the lining (this just made everything so much easier to work with! Instead of having 6 pieces of fabric floating around, I only had 2.)
- I sewed about a .5" seam using a straight stitch, you'll see why I did smaller than an inch later


You should have two exact replicas

Step 11: Sewing the skirt piece together
-Lay the two right sides of the skirt together, and sew one seam down each side with about a 1" seam (This will cover up that .5" seam that we did early.)
-Cut off any extra fabric or else it will bunch up at your hips
-Make sure your thread is the color of the lace so it doesn't show up on your pretty lace!


Sewing past the .5" seam from earlier
Step 12: Assembling the dress
-You should have one top now, and one skirt. We need to combine them!
-This is going to be extremely hard to explain, but it's SO easy to do! If you've ever made any sort of tote bag, you need to assemble this dress like you assemble a bag with lining.
-Turn both garments inside out
-Put the inside of the top into the bottom of the skirt - so the seams should touch around the top
-Sew a .5" seam around the top of the shirt/bottom of the dress
-I pinned the top and the skirt at the each of the sides, so that I knew the dress would line up properly, and then just sewed in an entire loop


Turn that bad boy inside out, slap on a belt, and you have yourself a super easy, custom made dress!

Just a random up close picture of the hem on this dress. I'm 99% sure that this dress is made out of lace that is supposed to be for a tablecloth...


Please let me know if anything doesn't make sense. I'd be happy to help anyone because this dress was ridiculously easy and cheap! : )