Showing posts with label make ya own clothing. Show all posts

Friday, May 3, 2013

DIY - Easy Dress, NO Pattern! In 40 minutes!

Let me start off by telling you one thing...I'm a dress girl. Before you start thinking "this bitch..." let me explain to you why. I'm not a heels and girly girl dress type, I like simple dresses because they're easy. It's so much easier to grab a dress out of my closet and go, than to mix and match outfits. I've been wanting to dive into the dress making scene for a while, but I was too scared to make some sort of abomination of couture! I've made a ton of skirts, but those require matching tops, and ain't no body got time fo' that!

I decided to make the leap, and only had about 1.5 yards of fabric, but I did it! I made my first dress.

Here is the first one I made...in 40 minutes! Seriously. Severina is my witness, I cranked this bad boy out!

After my first attempt, and realizing that it wasn't an epic fail. I wanted to try something a little more difficult, and decided to make a tutorial while I sewed it.

Easy DIY Dress, No Pattern! In 40 minutes! : ) 
Supplies Needed:
-*1.5 yards of heavy jersey knit fabric (the heavier, the better!)
-*1 yard of lace (if you want to make a lace one like my dress)
-Coordinating thread
-Measuring tape
-Pins
-Good Scissors
-Sewing Machine
-Optional - Hug snug

*Supplies are based on my 5'3ish frame
Step 1:
-Find your dress! Look for a dress with simple lines, not very many seams, and no zipper! We are making a dress out of jersey material, that should be very easy to pull over your head.
-This is a simple dress that I've had forever, it's just a basic Roxy one with a very high waist. I replicated this dress exactly in the floral print, but decided to make it a little more low waisted for my lace dress.


Step 2A: Plan and cut out the bottom part of your dress (I will call this the skirt for the rest of the tutorial)
-I folded the top of the dress down, and cut 1 inch around the entire outside
-Follow the natural seams of the skirt
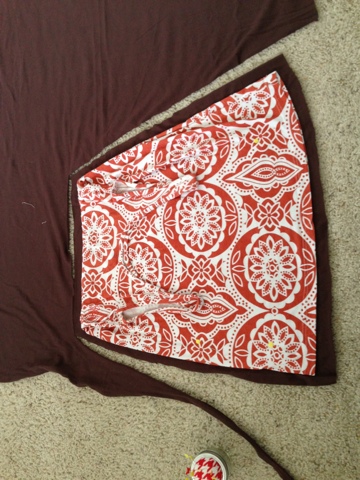
Step 2B: Cut out 2 skirt bottoms
-I always cut one piece from the "pattern" and then cut the second piece from the piece I already cut out, I do not like to work with lots of fabric when it comes to cutting, so this is my way of not letting the jersey knit get to me.

Step 3: Creating your dress top
-I laid the dress top on the fabric and cut 1 inch around the entire top piece
-How long you want your dress top to be is up to you. You may be happy with an empire waist, or a lower waist, just measure yourself and give it a shot. You can always make things shorter, but NOT longer. Remember that!

Step 4 - Part A
-Fixing your dress top
-If you tend to cut fabric like me and Helen Keller, you'll have jagged lines. As you can see in this picture, my sides are uneven, and I wanted to fix this.

Step 4 - Part B
-Fold over your top in half, and cut around the sides to even out your top
-Remember, fabric moves, and shifts, and you'll never get two perfect anythings, ever!

Step 5:
-Cut another top from the one you already created. You should have two tops and two bottoms by now

It's starting to look like a dress!

Step Six: Lace 
-Technically the brown part of this dress was my lining, pin your skirt lining to the lace, and cut out two skirt pieces of lace
-You don't need the lace if you don't want it, you can skip all the lace steps if you want to : )


Step 7 - Option A
-I took a sewing class once, and made a custom fitted skirt, and my teacher raved about hug snug. We used it for the hems in our skirts, but I have something outrageous like 300 yards of it, so I've been using it randomly on other projects.
-If you want to, and you definitely don't have to, but I used it to create a more finished looking seam on my top. I only did this on the brown dress, the cute floral jersey one doesn't have this at all. I was merely experimenting, but you can see how I constructed my top with this hug snug
- I found that the top laid flatter with the hug snug, but honestly, unless you plan on making a ton of dresses, I'd totally skip the hug snug!
Step 7 - Option B
-Fold over your fabric 1/4" and zig zag stitch around the neck of the top and the sleeves, but NOT down the sides
-Do this for the 2 tops
Step 8: Strap time!
-You should now have two tops with beautiful seams on the sides of the sleeves and the neck
-Let's sew the straps of the dress together at the top
-With the RIGHT sides facing each other, sew a straight line across the straps, cut off the extra material


Cut off those extra pieces at the top!

You should now have an adult bib, with the sides open

Step 9: Side seams
-With the right sides of the top facing each other, sew a 1/4" seam down the sides of the top
-You should continue down near the armpit/sleeve of the dress until the bottom
-You can do this a few times to get the look that you want, if you want a more fitted look, sew at an angle slightly going in towards the bottom


You should have a glorified crop top now!

Step 10 - Attaching the lace to the lining
-Pin the lining to the lace
-Sew down the sides of the skirt on both sides to attach the lace to the lining (this just made everything so much easier to work with! Instead of having 6 pieces of fabric floating around, I only had 2.)
- I sewed about a .5" seam using a straight stitch, you'll see why I did smaller than an inch later


You should have two exact replicas

Step 11: Sewing the skirt piece together
-Lay the two right sides of the skirt together, and sew one seam down each side with about a 1" seam (This will cover up that .5" seam that we did early.)
-Cut off any extra fabric or else it will bunch up at your hips
-Make sure your thread is the color of the lace so it doesn't show up on your pretty lace!


Sewing past the .5" seam from earlier
Step 12: Assembling the dress
-You should have one top now, and one skirt. We need to combine them!
-This is going to be extremely hard to explain, but it's SO easy to do! If you've ever made any sort of tote bag, you need to assemble this dress like you assemble a bag with lining.
-Turn both garments inside out
-Put the inside of the top into the bottom of the skirt - so the seams should touch around the top
-Sew a .5" seam around the top of the shirt/bottom of the dress
-I pinned the top and the skirt at the each of the sides, so that I knew the dress would line up properly, and then just sewed in an entire loop


Turn that bad boy inside out, slap on a belt, and you have yourself a super easy, custom made dress!

Just a random up close picture of the hem on this dress. I'm 99% sure that this dress is made out of lace that is supposed to be for a tablecloth...


Please let me know if anything doesn't make sense. I'd be happy to help anyone because this dress was ridiculously easy and cheap! : )


Tuesday, April 30, 2013

New Bern Sewing Summit 2013!

I am back! After a fun filled weekend of much sewing, laughs, and sightseeing, I am finally back on my computer! I can't really see straight, and my back hurts, but it was worth it. There is nothing better than sewing with one of your best friends all weekend.

Day One:
I moved my sewing room around a bit, I gave up my sewing table for Sevi. Her machine is like royalty, so I knew I had to step aside. Here was our set up this weekend. The only addition we made was the trash can between us for all our scraps and threads. We burned through so much material this weekend, it was insane!


After picking Sevi up from the airport, we cruised around New Bern for a hot minute. We made a stop at an antique store and scored some goodies! I completed my Pyrex primary color refrigerator set! Can you believe these dishes were introduced in 1949? Seriously. I scored the two little red ones from the Long Beach Flea Market last year. A couple of women were debating about buying them for 10 minutes, and I got sick of listening to them, so I walked over to them, grabbed them from underneath their noses, and swooped them up! HA! The yellow one was on sale at the antique store, as was the blue! Double score! A full set for only $30, on Etsy they are going for $70ish, dream big!


Down the street from the antique store is Nicholas Sparks house. HAHAHA. Seriously, though. This is his house. We originally thought it was another large house, but a neighbor came outside and gave us the right address. People are that nice in the south, they're willing to give out local celebs addresses! We googled his house once we got home, and yup, it sure is, the gates match the pictures online. 

Sevi was only off the plane for a hot minute before we started sewing. We both made lists of what we wanted to make before she came out here, here is mine, and here is hers. Can you believe we made everything on our lists!?! (with only one epic sewing fail, but we attempted it!)

Sevi found this adorable bag on Etsy, and we thought it would be the perfect tote to make for our fabric shopping trip the next day. I secretly have been hiding the fact that I am horrible at making bags. So bad, that I never make them for anyone because I don't understand how to do lining. Thankfully, Sevi is a rockstar with lining, so she finally helped me see the way! I had leftover fabric for us to use, the Chevron was from a gardening apron, and the burlap was from bunting flags. I love it when I can open my fabric cabinet and create something from something I already have.


Up Close!

Day Two:
The next day we woke up, put on our faces, and we were ready to hit the town for some shopping. Unfortunately, my little sloth was not happy to see me go. He needs some doggie prozac ASAP. This picture keeps cracking me up for some reason!


Sewing just brings out my inner retro girl. 

We had afternoon coffee and snickerdoodles on my adorable Pyrex/Corelle 
set my from mom. I'm pretty sure I've shared this snickerdoodle recipe before, but since it's so delicious, I'll share it again.

I knew I was going to eat like a raging rhino this weekend, so I was feeling guilty, and being the true best friend she is, Sevi agreed to go on a little hike with me! We went into the woods next to my house, and randomly ended up going down someones driveway, and I look over and see a machete stuck in the tree. This knowledge makes me feel extra safe at night


I took her into base, the illegal scary way that I feel I should report ASAP to someone. I brought my ID with me JUST in case, but this is how this sista got into the base. Tuck-n-roll girl, tuck-n-roll! I was glad to see that we are not the only people that go into base this way, there was tons of fresh doggie prints on the beach!


That night we decided to do a simple craft. Sevi made a bag for her sister, because as soon as Sevi stepped off the plane here, her little sister went into labor, OF COURSE!

I found all the polka dot prints in the scraps pile of Hobby Lobby, so I was excited to make these! I also bought this little handy tool that makes snaps in fabric. It's near the cloth diaper section of fabric stores. It's AWESOME, and I've already used it to fix a little girls bathing suit!


This vegan now has reusable paper towels!

Day 3:
At Hobby Lobby I walked by the gingham section, and I was drawn to it. I've stared at this section for weeks now, and I finally made the leap, the jump, and got an idea. Gingham is the new chevron. I'm telling you. I picked out these colors randomly, there were probably 20 different shades of different gingham, but I wanted a sort of color wheel affect. I used this tutorial to construct it, and it's sooooo (sew) easy!


Sevi made an adorable Chevron quilt, that you must see! It's so soft, that the dogs just couldn't resist laying on it. 


and yes, he did stay just like this!


Quilted, basted, and bound! - Front


Back - this is a vintage Cannon Monticello sheet I found at the Salvo back in Oceanside that has been screaming to get used. Happy to see it with this quilt!


Up close of the gingham, I'm obsessed!


Day Four:
I made a dress! YES! I didn't make the one I wanted because I couldn't find any cool vintage shirts, but I'm SO happy with this one, and it only took me forty minutes! I am going to create a tutorial for this type of dress, but just a heads up, there is no pattern. I made it from a dress I already had! I was pretty stoked with how it turned out. It's out of this amazing jersey/knit material that hangs beautifully!


I wear a belt with everything.

Day Five:
I bought this lace fabric from Hobby Lobby to just make a skirt out of, but after I whipped that dress out so fast, I decided to give it a go. I have a tutorial for this dress. I took all the pictures for it, I just need to sit down and write it, so it should be up later this week! I was so happy with this one because it's lined! And lining, is a very difficult thing to do!

BTW. I'm pretty sure that lace fabric is for a tablecloth, oh well!


Please don't mind my naturally nappy hair, just notice the dress! :)

We ended our sewing summit with a trip to Beer Army. Which, well... Was interesting. The bar owners dad sat next to us, and basically tried to get Sevi drunk. I refused since I was driving, and if you know me; 1 is too many (hence the half beer here.) The funniest thing about this place is that you can, and they encourage you to, order pizza to the bar! So of course Sevi did, and it was DELICIOUS. She ordered pizza from a place called Gina's. They answered the phone, and she said "Hey Gina..." and started ordering...HOT. MESS.

I was a horrible vegan cheater (cheese only), and it was sooooooo worth it.


-----------------------
Can you believe we did all this in such a short weekend!? It was such a blissfully fun time! I forgot how much I miss having close friends and family nearby. It's rare to meet someone who is what I like to call "down for anything." I used to call Sevi and Megan at the most random times and ask them to go to Target with me, hit the Military Police in the face with pool noodles out of my car window, or just something normal like get coffee. Living the military lifestyle is difficult, because you meet these amazing, wonderfully good people, become extremely close, and then in 2-3 years, they're gone to a different state, and so are you. It's hard to stay positive in this lifestyle, which is why whenever I leave my friends or family, I simply remind myself of my favorite quote...


"Perhaps if we never veered off course, we wouldn't fall in love, or have babies, or be who we are. After all, seasons change. So do cities. People come into your life, and people go. But it's comforting to know the ones you love are always in your heart. And if you're very lucky, a plane ride away."

Thanks for taking the time to come out and see me Severina! : ) 

Sunday, April 21, 2013

DIY: Retro Bikini from no pattern

Let me start off by saying, I was born in the wrong decade. Don't get me wrong, I love my life now, and my iPhone, and couldn't imagine it any differently, but sometimes, I just wish I was a lady of the 50's. Everything was so classy then. Dressing up to go to the movies, going on a plane, dinner dates, powdering your nose. It was a beautiful time, and I'm always drawn to anything from that era. Pyrex, winged tipped oxfords, sweater guards, I love it all.

If you have a Pinterest account, you've no doubt come across those adorable pins for retro bikinis. I know I have. I always click on them with the desire to purchase the most adorable retro bathing suit, to find out that they seem to ALWAYS come with a $200 price tag. I've had an idea to make my own bathing suit in my head for some time. I didn't have a pattern, I hate patterns. My ass and hips aren't anywhere NEAR the same measurement. I am a petite person, but I can guarantee you that my ass is not, so patterns are so frustrating for me to work with.

I took a sewing class last year in Oceanside and the teacher encouraged us to go home, rip up our favorite outfits, and make a pattern out of them and recreate these garments. While I'm not down with ripping my favorite Bettie Page dresses apart, I was intrigued by the idea.

So, I decided to drive over a hour to the nearest legit fabric store, and dive into my project...

Here is everything that I did, with explanations which I hope encourage you to make your own!

Supplies Needed:
-1 full yard of bathing suit material (just to be safe! I did 1/2 a yard of two colors)
-1 full yard of bathing suit lining (it's usually in the same section, it's not pictured, but it's beige)
-4 buttons
-Large graph print paper from a fabric store (to make your pattern)

Step 1: Find your suit!
-So, this isn't my favorite bathing suit, it was one of the ones I own with the most coverage, and could untie. I did cut up another bathing suit, but this one had a nicer shape, so I went with this one.
-As you can see near the crotch area (hehe) there is an "+" this is where my crotch seam met the butt seam, it's also where it fits me directly in the middle of my nether regions, so I made that the "middle" of my bathing suit. This bathing suit is made up out of one piece, and I sewed it together at the sides. It's literally based on the idea of a diaper, doesn't that sound SO attractive!
-I measured myself from my nether regions up and decided that 12 inches was enough room for me to get a high waisted look. I wanted the bathing suit to hit me right below my belly button, but you can make it higher, it's just really up to you on what you'd like. So that's what the _ line at the top and bottom are, that is 12 inches from my middle area, to my stomach, and my back. (I'm about 5'3)

Step 2: Trace your bottoms
-I traced the bathing suit exactly, so I could see the shape of the bottoms. It looks like a giant diaper doesn't it?


Step 3: Measure your waist
-My waist is 26" so I made two 13 inch lines, one for the top, one for the bottom, this will be my waistband.


Step Four: Create YOUR bikini!
I just went with this and did what I thought was good. You'll notice, it's a little lopsided on the right, that's okay, with sewing, you can ALWAYS take things in. I made this a little larger than I thought I would wear because I'd rather have to make it smaller, than need it bigger.


Step Five: Cut your pattern out WITH SEAM ALLOWANCE
-I've gotten pretty good at eying what an inch is, so please allow yourself an inch, and measure if you have to! You do not want to sew close to the edges of a bathing suit, I'll explain why, but give yourself an inch, you can always trim the edges later!


Step Six: Cut out your bikini bottom fabric
-I'm always worried about making things too small because I did that once with a custom skirt, so I'm forever haunted. You'll notice, I cut the bikini material from the pattern, then the lining is from the bikini material...


Step 7: Cut out your lining
-Unless you want to be rockin' a MEAN OLD camel toe at the beach, you NEED lining. Use your bikini material as the pattern for this one so it comes out evenly.


Step 8: Pin lining and Bikini Bottom together
-So, with the right sides of the fabric facing each other, sew along all four sides of the material, stopping close to any end so that you can turn it right side out.
-It's not pictured, but after I sewed around all sides, flipped it inside out, I stitched it closed, and then went around all the seams with a straight stitch, that's optional, I really don't think it did anything for my suit...I just wanted a more fancy trim.

Step 9: Sew
-ZIG ZAG, I'm pretty sure every basic machine comes with a zig zag stitch nowadays, I also used a special needle for sewing knits and stretches, you can find those in the needle section, but honestly, I think these are a gimmick!


Step 10 (Not Pictured) - Sew the sides together
-I sewed and re sewed these bottoms about 5 times to get them to where I wanted. Keep trying them on and pinning them to adjust the sizing, that's what makes them custom! Just sew the sides together (where your hips are) with the right side of fabric together to attach them together.
- I also sewed on the buttons, my pretty anchor ones were too small, but I'm happy that I had these other retro ones lying around to use.

Step 11:Find your top
-I wanted a bandeau style, so I pulled out one that fit well. Trace it out just like the bikini bottoms, don't forget your seam allowance!


Step 12: Cut out Bikini Top Fabric
-As you can see, I made mine into a sweetheart shape, I just wanted it to be a little more fitted than the one I had.


Step 13: Pin right side of bikini top and lining together
-Sew around the top and bottom (NOT THE SIDES)
-Optional - I bought bra cups, and put them in here to give my boobies some shape, I tried the top on without them, and it looked just fine, but I think the bra cups help keep it up.


Step 14: Creating Sides
-I didn't copy a pattern on this one. I just made it based on what I thought would look good. On the edges, this is the same width as the top, and the bottom is skinnier because I don't have a clasp, so I am going to tie it together.
- I sewed around three sides, turned it inside out, and sewed the end bit closed.
-Then I just attached it to the bra piece with the right sides facing together. (Like the bottoms)

annnddddd you're done! I didn't include directions on how to do the bow, because it's extremely easy, and if you have sewn anything, you've sewn a bow before, I'm sure! :)

My husband is in Florida for 3 weeks of training, so this is the best picture I could get by myself! : )
BAM!

And now I am sunbathing on our porch, refusing to take it off.


What I learned from making my own bikini.

1. Patience is a virtue. I wasn't kidding when I said I sewed these bottoms probably 5 times. What I mean is, that I kept making the crotch area smaller so that it didn't bunch up. I would go in about 1/4" every time, because I didn't want to make it too small. This was a great idea, because the final time I sewed it, if I would have done more than 1/4" it would have been too small in that area!

2. A one inch seam allowance is perfect! If you sew too close to the edges, with a zig zag stich on bathing suit material, it bunches. It's really hard to explain, but I played with the fabric before I sewed with it. If you've seen those scrunch bottom bikinis, that are sort of curly and wavey at the ends, that's what it does to the fabric when you sew close to the edges. By sewing close to the end of the seam, it won't lay flat, it will curl up at the ends.

3. Stretch the Fabric! I know that is going against every knit cardinal rule you've ever heard of, but it's true. This is NOT a knit material, if anything, this material is your ENEMY. If I didn't stretch the material when I was sewing, it would have taken over my sewing machine, and conquered my life! 

4. Don't give up! It was hard, but I stuck with it, and I am so happy with the results!