Showing posts with label craft. Show all posts

Wednesday, September 18, 2013

Starbucks Chalkboards

Did you know I work? From emails I've been receiving from people, or comments about how I just have so much time to work on things, I don't think people realize that I work, go to school full time, and craft like a crazy lady. I make time to make beautiful things, because it's what I love.

Moving on...Where I work we have a Starbucks. I'm pretty sure you can all guess where I work,  but when I was hired I had to sign a piece of paper stating I will not talk about my job on social media because I'm Human Resources. Weird, right? So, I'm not stating where I work, I'm just talking about a sign that I made. Evasive right? ;)

Anyways, HR jobs are glorified interior decorator jobs. Replace table cloths, have pretty writing, write peoples names elegantly on various items. Seeing as how I loooooovvvvveeee chalkboards and writing, the Starbucks girls propositioned me to do their chalkboards for them.

Hi. My name is Elizabeth, and at one point, I was addicted to Starbucks. I went to Starbucks everyday for 2 years. True story. Anyways, I always loved to look at their chalkboards and wonder who the hell did them because they were fabulous. Well. Here is their secret! You receive a sort of planner that tells you what to put, and you're not supposed to deviate from the plan. Sad, right?

So, the Starbucks girl gave me this paper, and a chalkboard and I had to create. The pumpkin spice latte is actually cardboard and on a magnet, and so is the wording. So I had to recreate this below on a chalkboard...

The reference guide

I've mentioned before that I can pretty much copy anything. When I said that, I meant copy writing. Drawing, eh... The wording turned out cute I thought, but the drinks, they left a little something to be desired... I also did a little free styling because I just HAD to. Overall, I think it looks pretty good!


Anyways, fast forward to yesterday. I walked into the store and found that my chalkboard was down and missing in action. Nicholas Sparks was here signing copies of his new book, and they wanted to promote the book signing. I had to erase all my hard work and I had twenty minutes to come up with something. I do not create quickly, so I had a mild anxiety attack over a chalkboard. It could have been better, especially the drink names at the bottom, but I was in a time crunch! I was the happiest with how I wrote his name. I hope Nicky sees it and starts thinking about using this way to write his name in books! ;)

PS. That is some of Starbucks secret menu and it's DELICIOUS!


I saw one of his publishing agents take a picture of it and told me she was sending it to New York. I asked her if she was posting it online, and she said yes. She was from Grand Central Publishing, and they put it on Instagram and Twitter. I should have asked her to tag me! ;)


And on twitter! :) 


Unfortunately, I didn't accomplish my goal of getting a picture of me twerking behind Nicholas Sparks. But, luckily,  he lives here in New Bern, so there's always another day.


Tomorrow I get to erase the Nicholas Sparks chalkboard and create the pumpkin spice latte one, again! Wish me luck a second time around!

Sunday, September 8, 2013

I'm not a witch at all - Chalkboard Tutorial

Chalkboards are everywhere right now, and seeing as how I have an obsessive personality, I've started creating them and writing on them in mass quantities. If you remember from this post my dear seester put me to work when I went out to visit my family earlier last month. I should actually thank her for forcing me because she sparked my crafting bug once again!

Anyways, I've been googling, researching like crazy how these people do their chalkboards, and I've learned a lot these past few days. I thought that these people were just coming up with their own fonts, and creating like crazy. I'm sure there are people that do, but I need something to go off of.

Want to create this?


Here is what I did!
1. I went to dafont.com
2. I searched for a font, I know one that I like to use - it's called "chalk hand lettering"
3. I searched and selected "CHL" and then typed the word that I wanted, in this case it was "good witch" and "bad witch"
4. I took a screen shot of each word, so I did a screen shot of "good" and one of "witch."
5. I opened a word document and inserted my screen shot into the document.
6. I enlarged the picture and printed out the document to use as a reference guide.

Unfortunately, I do not do the thing where you can shade the letters with chalk, and then press it against the board like in this tutorial. I just don't want to waste ink, and I'll be narcissistic for a hot minute, my hand writing isn't too shabby.


Before I left California my sister had a friend who was getting new windows, and had all these old babies just lying around. I took all of them. I believe there were 12. Well I'm down to 8 now from various other projects, and I gave a few away.


I taped off the window completely so that none of my chalkboard paint would seep through. This is the chalkboard spray paint I use. My husband doesn't use anything besides spray paint because apparently he mastered that technique. I'm not so good, but I think that since the chalkboard spray paint is already super thick, that it was easy to use.


I just sprayed lightly back and forth, for about 3 coats. It looks like it's uneven, but it's drying!


Here are the two templates I went with. Here are the templates if you want to use the same ones. 

I also use these markers from Michaels, but the thinner tipped ones. Also, if you make a mistake, fix it right then and there or else it's a little hard to erase. This is not a project that you can come back to later, you need to do it in one sitting.

I stuck it up on my mantel where it belongs halfway through to see if I liked it or not. I wasn't too sure how great of a job I was doing.


I finished and I actually enjoy it! I wish this wasn't a two paned window, but hey. It was free. What do you want, Gidgie? I'm enjoying it and looking at it right now. I'm already thinking of what to write for Thanksgiving and having a panic attack of having to erase it and recreate it next year!

Halloween Sign Tutorial

Happy Halloween! Oh! What's that? It's only September? Well well well. Let's break it down. There are 52 days until Halloween, and yes. I am already counting. I LOVE Halloween. You have to have some serious love for this holiday to create a countdown for the neighborhood children, right? I'm excited about Halloween this year because I'm in a new house! I'm also slightly nervous. You see, back at our old house in Oceanside, our little community was like something out of a movie on Halloween. There were kids everywhere. Mobs of them, and I secretly think that kids would get dropped off in our neighborhood because the knew the lady that lived at 714 Morse was hooking kids up with candy. Last year my husband acquired some full sized candy bars from the baby recruits who go through boot camp, and I handed out full sized candy bars (we had a huge moving box full of them) and went through $100 in candy, and we had to turn our light out because we ran out! See, INTENSE!

I'm eager to see how a North Carolina Halloween compares to a California one...

My sister sent me a picture of this exact sign last month, along with the blog. See, this isn't just something you can fetch from a Hobby Lobby, I mean a Home Goods, I mean from someone on the side of the road. You've got to see this tutorial first. ;) And here is the blog of the girl who made that sign, she's adorable!

 I did things a little different than her, and I actually have the words for the stencil that you can download if you want them.

What you need:
-Wood (1x4 in this tutorial) however big you want it, you can click on the tutorial link above for more specific wood instructions
-Black, Orange, Yellow, and White Acrylic Paint
-Teeny Paint brushes
-Washi tape (to hold stencils on the wood)
-Wood Glue
-2 Chalkboards
-Printer


Step One:
The first thing I did was take advantage of the week of leave my husband had. I texted him a picture of the sign from work along with one word, "Puhlease?" and when I pulled up in front of our house 4 hours later, I found him waiting for me with our dog upfront and this bad boy. God bless him!

He used 1x4s and cut them at varying lengths and nailed them to the two long poles you see at the bottom. It was very sort of haphazardly done (I didn't share the girls tutorial with him before this, whoops!) This one was rather large, but hey, we have a big lawn. I want peeps to see this from the street.


Step Two:
Print the stencils, cut and tape to the board.

Here are the templates - it takes you to a Scribd website - totally fine!
It's all about the candy stencil
Candy Stencil
Days Countdown Stencil


Step Three:
See how it looks. If you're going to spend an insane amount of time on a project, make sure it looks fabulous beforehand! I put hay under mine to hide the legs of the sign.


Step Four:
Cut out the words. This is how I got that beautiful writing! I only freehand with chalk - paint, not so much. I cut out everything and then trace it with pencil and paint the lines with teeny brushes.


Don't forget to do those candy corns first!


Step Five:
Use wood glue to attach the chalkboards


Step Six:
Put one of your best friends in front of it to model.


Step Seven:
Question the four hours you spent making the sign, and realize that you're bad ass in that headband, like Brett Michaels.


Step Eight:
Hang out with your wang out. DISPLAY!!!!!


Please let me know if you have any questions! On a difficulty level, I'd say this is a 3. If you can cut and trace, and don't have shaky hands, it's SUPER easy!
: ) 

Wednesday, August 14, 2013

Quit Slackin' and Make Shit Happen

Last week I packed up my ish, woke up at 11:30pm California time and headed out for an early flight back home. It was weird going back home because I am so used to North Carolina, that I forgot what it was like to live in California. I haven't been home for 8 months, which I cannot believe. My husband would literally go years without seeing his family, and I always thought that if I ever had the chance to hoof it cross country, I'd probably come home every 3-4 months at least. Well, now that I have a job, and I'm in school full time, and I have two pupperonis that need loving, I realize how hard that realistically is. Not to mention the $650 price tag that comes with flying from our teeny New Bern airport into Los Angeles.

Anyways, I had a grand old time. I miss my family, I miss my nephews, I miss the weather. Running every morning and not being covered in a fine layer of sweat was bizarre. I was actually cold a few mornings, and I haven't felt that for months.

My sister has had a chalkboard on her wall for a while, and she was patiently waiting for me to return home so I could decorate it for her. I've never decorated a chalkboard before ever, and I was surprised how easy it was.

I have to say, the hardest part about creating this chalkboard was finding the perfect quote. We googled and were on Pinterest for some time. We didn't want a seasonal one (which is what the majority of them were) because I don't know when I'll be going back, so I finally found a tutorial, and a free printable, and we were set! Here is the website I used to get the printable, and here is the website that I used the tutorial from.


If I had to do this all over again, I'd...

1. Do no use the chalkboard markers to create your grid. Trust me on this. Or you'll spend hours erasing the little tiny lines with a magic eraser. Use a piece of chalk to create the grid.
2. Screw the math that girl tries to explain. Take the width of your chalkboard, say it's 48", and divide is by 8 - the answer isssss SIX! So your boxes across should be 6 inches apart in the width. Then take the length, say 96" divide by 8 and you have 12. So each box should be 12 inches apart lengthwise. This makes WAY more sense to me than the math equation in that tutorial.
3. Stick to the grids! I went a little cray cray and did some free handing, and I think that the spacing is off.

And that's it! I currently have 8 windows in my garage that are screaming for me to paint them and write seasonal things on them. So I must be off. : ) 

Wednesday, March 27, 2013

DIY - Sugar Skull Ceramic Pot

I'm not going to lie...I saw this pin on Pinterest, and thought it was adorable. So I decided to make my own! It was actually fairly easy. I thought it was going to be a nightmare because I do not have a steady hand with a paintbrush, at all.

What you need:
-Ceramic Pot
-White Spray Paint & a clear topcoat
-Pencil
-Acrylic Paint and Brushes
-Plant and potting soil

I have a lot of this stuff already because I am a crafting hoarder, but if you wanted to make everything, you could go to Wallie World and probs pick up the whole deal for 10 bucks. Seriously. Depending on the amount of colors you want to use, I already had all those colors...

So...

Step One - Not Pictured:
-Spray paint your entire pot white, this took me a few days because I was in and out of the house, and my husband is a spray can nazi. He would only let me gently mist the thing, and it literally took DAYS to get the ceramic orangey color to not show up!

Step Two: 
-Draw your sugar skull with a pencil
-You'll notice I made some mistakes along the way, but I left them because I was going to cover them with black anyways
-The best thing about this project was that I could erase! I erased that damn mustache about 20 times before I got it the way I wanted.
-Also, if you don't feel like making up your own like I did, print one of these out and trace it onto your pot by pressing hard, but gently with a pencil


Step Three:
-Paint!
-I used the smallest brushes EVER for this project, and went slow. I think that's what helped make this project not look like shit. Of course, always start with the light colors first. Here I bounced from yellow to black because I was waiting for the yellow to dry before I added the red.
-I also used the back of a brush for all the dots. I did draw them so I knew where I wanted them, but I just simply dabbed the back of the brush into the paint, and went around the eyes, super easy, and it didn't glob up. Acrylic paint is the shit!


Step Four (Not Pictured)
-Clear coat, so that when you're watering your plant, your sugar skulls face doesn't melt off!
-Slap your plant in!

Step Five: Display
-And enjoy! : )


I might make some more, but I need to check myself, because I can get easily obsessed with something, and then go ape shit crazy and make like 12 for my house... Coughbuntingflagscough

Sunday, March 10, 2013

Update - Whatcha Making?

I have been very busy lately, and unfortunately neglecting any and all pictures of my latest crafts. My family is coming to visit April 1, and I decided to make a quilt for the extra bed, and pillows, and curtains, and decorations...You catch my drift. Luckily, I've had an insane amount of energy. So enjoy the photos below...

Remember the Valentine's Day bunting flag I made? Well, I loved it so much, I made a St. Patty's Day one too.

I made my two little nephews dinosaur hoodies for Christmas, but not my older nephew because my sister and I weren't sure that he would like it. Well they both got dino hoodies, and my older nephew wanted one too! So I whipped out this bad boy and mailed it out there to him. I had to try it on before I sent it because I was considering keeping it, I was really happy with how it turned out. I'm glad Luke loved it because he's a special little guy. He was my first nephew, and I called out his birthdate before he was born. I knew he was going to be born on Saint Patricks Day, I just knew it! 


Lukosaurus - I miss this little guy!

Oh and guess WHAT? Mama finished decorating the reading nook! FINALLY. I made this little chevron throw for that area because I actually do use it, and like to cuddle up with a blanket when I read. The quilt is quilted in a chevron pattern as well, so it's reversible. The back side, which I don't have a picture of, is a vintage floral sheet. 


When Hobby Lobby opened, they had a ton of that burlap chevron print. I saw they had a whole yard of this color in the remnants for $4!!! I swooped it up and made a pillow for my nook. You can also see the quilting of the chevron throw better in this picture.

And here are the fabrics I am using to make the extra bedroom quilt. That top piece is a vintage Monticello sheet. I have a whole set, SCORE! I'm using the flat sheet from this set as the backing to the quilt. It's looking pretty good. I'll post the finished product hopefully later this week because I've already assembled the top quilt!

I made this lovely cup at my craft group this week. Too cute right? I just want to have a backyard BBQ and serve lemonade in them! 

I've been feeling very productive lately because it feels like spring! Yesterday I took my husband out of the house for a run/bringing him to the house of pain. I've upped my mileage, so when we run 4 miles, it's like a cake walk. I ran last week with him and he nearly died, and we always sprint the last little bit to the car or the house, and he had his ass handed to him by me.

Anyways, I've been running through my neighborhood, and a few days ago I came across this weird driveway that looked like it went into the woods. Now, I've seen horror movies, I know not to go back there alone, so I waited until yesterday so I could run there with Dustin, and it was AMAZING. Isn't this just a beautiful picture? The light streaming in? The woods full of color? Spring people. SPRING!

So we were walking, and we came across this fence. Chained, barbed wire around the top? Yeah, we went in. Good thing I brought my phone with me because we found out we were actually crossing over into Cherry Point MCAS. Isn't that safe? I didn't take pictures of what was behind the gate because secretly I was afraid we were going to get into trouble. So we ran through a forest towards the water, and ended up on the Neuse River. I always say it's the "beach" because, we'll there is sand! It was so beautiful because it was like an untouched beach. I'm sure other people in our neighborhood know it's there, but do they have the balls to cross the fence? Probs not.

Today we are making a headboard, and I'm actually remembering to take pictures, so there will be a detailed tutorial of that soon! : ) 

Sunday, March 3, 2013

Oh, deer...

Frankly my deer, I don't give a damn.

Oh how I wish there was a button that said that on Facebook. I'd be clicking it like a mad woman. Anyways, before we moved, I threw all my old bathroom stuff away, except for the framed picture I had, because I figured it could be a good project, someday. Fast forward to 6 months later, and it was still taking up valuable real estate in my craft closet, so I took it out and decided to do something with it.

I woke up this morning, put on my big girl crafting panties, and made THIS!
**The inside part of this frame (so not including the border) is 11.5"x11.5 because it was framed art, not a picture frame. So take that into consideration when you're buying an empty frame for your deer.

Oh what's that IG friends? You want me to make you one? Hahahhha. NOT. Make it yourself, by following these lovely directions below.

What you need:
-1/2 Yard Fabric - My favorite fabric for pillows and painting is Duck, it feels like a rough canvas material
-Paint of your choice - I used acrylic paint from Wallie World
-Printer, Scissors, Tape, Paint Brushes, and Pencil (only use a pencil if you're doing a dark color, for lighter colors, use that color in a fine tipped sharpie)
-Frame - Hobby Lobby has open frames, and if you buy just one item, you can check out with their weekly 40% off coupon
-Staple Gun


Step One: Download, print off, and cut out this template from yours truly. 

Step Two: Attach the template to the canvas with Washi Tape, 
and trace the template.
Washi tape is sort of like painters tape, it comes off so easily. They have it in the office supply section of Target, but you can use any tape. 
I use Washi tape because I keep all my templates.

Step Three: Paint & put a piece of printer paper under the fabric so you don't end up with that lovely blue stain like I have on my coffee table from another project.
 Get yourself some good brushes. My favorite ones are the straight angled smaller ones, I use those for the edges, and a teeny one that I used for the antlers.

Step Four: Replace the paper underneath the deer with a clean new piece, 
and let the deer dry completely. 
Paint will seep through, and if you leave the same piece of paper underneath, it will stick and when you remove it you'll be able to see it through your fabric.

Step Five: Attach to the back of your frame with a staple gun, 
then cut off extra material. 
It's okay to pull it taut, I did! Also, don't worry about how it looks on the back, no one sees behind your frames!

Step Six: Hang and enjoy! 
Please comment about how crooked that "W" is so that my loving husband will finally see that it IS crooked and rehang it. He doesn't believe it's crooked. He thinks the letters are crooked!!

This craft took maybe 30 minutes. If you're a little woodland creature lover like myself, it would be a great craft for a rainy day.

Happy Sunday! : ) 

Wednesday, January 30, 2013

Dwight, get out of my nook!

That's what she said! That's what she said! If you know what this is from, you get two thumbs up from this girl!

I, the librarians daughter, have created a reading nook. 

When we first looked at this house, I loved it, but I kept thinking, "What the hell am I going to do with THAT area?" "THAT area" was the formal dining room. I don't understand formal dining rooms. They must get used what, three times a year? I understand some people like big, giant dining room tables to sit and enjoy a meal with their family. But for me, I would get so much more use out of a reading nook. There is nothing more that I love in this world, than a good book. Okay... maybe Petey, but books are a close second, my husband is third. ;)

This reading nook opens up into our living room so I couldn't go too crazy with the color scheme. My living room is pretty dark, with reds, and burnt oranges, so I thought brown would be a great color in the nook, and then that vintagey mustard color to make it pop a bit. I am so happy with the results, here is a looksie!

The anchor pallet I made, finally found a home. I also made that pillow, I painted canvas and sewed it into a pillow. There will be a tutorial later because 
I'm making a few for friends.

Other side of the nook

Other side of the nook, my grandmothers sewing machine on display

I've mentioned this on my FB and Instagram, but my husband has challenged me to "30 Days of Vegan." We are going to give it a try the day after the SuperBowl because let's face it, I want to chow like a pig. So we are going to give it a shot, with one break for the weekend that we're visiting my brother and his family. If you know my brother, Ethan, you'll know he won't stand for fussy eating. If I told him I could only eat Vegan, I'd wake up with a chicken wing stuffed into my mouth while I was sleeping!

So, I tried this salsa recipe off Pinterest and sweet mother, Mary of God! It was so good!!! I made it yesterday, but let it sit overnight in this super cute 70s mushroom Pyrex dish, and I ate it with my husband tonight while I cooked some chili, soon to be vegetarian chili! The salsa is so good that I'm making two servings of it for the marines on Sunday. I bought all organic ingredients too! I finally found what I think is the North Carolina version of Whole Foods - Harris Teeter. It's my new favorite store, I've already been there twice this week and it's 25 minutes away... I also bought those bright raspberries in my red Pyrex dish there as well. I love that Pyrex dish, because well, three Asian ladies were at the flea market debating about buying it for 5 minutes, and then I finally swooped in and took them out from underneath their noses and bought them.

I was making my Target list today, and fat Petey was crying at my feet the whole time. I took him outside, he didn't go to the bathroom. I gave him water, he didn't drink it. I didn't know what his problem was, so I picked his ass up and threw him on the counter in front of me. Love. He wanted LOVE. SO I drew on a blue eyebrow (you can see it on the upper right) and said "F IT" and let my dog lay his pee pee down right where I cook dinner. (The counter has since been disinfected since before I made chili.)

Petey Baby

The next few days shall be busy! I bought fabric for the chevron quilt I am going to attempt to start cutting tomorrow. I also need to make a decision on these unfinished throw pillows I have. My sewing machine is not cooperating in the ruffling department! 

Wednesday, January 23, 2013

Dog Bed Tutorial

{If you don't want to listen to me gush about my pets, and just want the tutorial, scroll down to the picture of the supplies needed}

I think it's time to talk about my pets. I am one of those weird people that is obsessively in love with their dogs, and is disturbed whenever I find out that others don't love their pets as much as I love mine. These dogs are my babies, my children, my companions. When my husband was gone all the time, it made it easier to come home to an empty house. There were and still are two little tails/nuggets wiggling and wagging when I came through the door.

I got Petey for my 16th birthday. I saw him and sobbed hysterically until my parents bought him for me, little did I know then, that he would end up being the largest Shih-Tzu anyone has ever seen. Smokey has a sweeter story, my husband wanted another dog because apparently it's not manly to be seen walking a Shih-Tzu in public alone. We really wanted an Australian Cattle Dog because I had one when I was younger, and they're just neat dogs. We went online and found one in the shelter, it was Smokey. He is the sweetest dog anyone has ever met.

Petey  & Smokey

Which leads me to this post. My dogs are divas to the extreme, our Oceanside home was all wooden floors, and they don't ever sleep on the floor, so I made sure that we had a dog bed in every room of the house. Well we we moved I tossed them all out, so even though our new house is half wood/half carpet (which I LOVE) my dogs are still used to beds, and refuse to sleep on the bare floor. This leads to them trying to sleep in our bed, or on our couch, or on the pair of pajama pants left on the floor.

We went on a mission when we first got here to find a dog bed, and we bought this teeny one from a cute little local pet store...FOR THIRTY BUCKS! I was in shock, it wasn't even one that I could wash, it had built in foam into it! YUCK! I looked at a few dog beds while I was at the store, and decided to make my own. I made one a few weeks ago and posted about it on Instagram, but I finally made another one with a zipper which is fabulous because I can unzip it and wash it!

So - here is the tutorial! Please let me know if you think anything isn't clear.

Tools Needed
-Scissors
-Thread
-Sewing Machine
-Pins

Time
-New Sewer - 1 Hour
-Old Sewer - 30 mins.

Supplies Needed
-3 Regular Sized Pillows 
- 1 50" x 60" throw
-1 24 inch zipper
(I bought all of this for $8.50 at Walmart, each pillow was $2.50, 
and the throw was on the clearance rack for $1 - I already had the zipper)


Step One: 
Fold the throw in half hotdog style, and find the placement for your zipper. I choose the side because it will be up against our TV stand, so the zipper will be hidden here. You need such a giant zipper because you're going to have to stuff it with pillows.

Step Two:
Pin the zipper down, and attach the zipper on one side. I did not include a how to on the zipper part because I felt that it would make this tutorial crazy long. But, don't hate me yet, I used THIS VIDEO TUTORIAL to learn how to do a zipper when I first bought my sewing machine. I suggest going to that tutorial and watching the video before attaching your zipper, but do not fear, zippers are easy than they appear!

Step Three
After you have attached one side of the zipper, do the other side!

TADAAAA You have a beautiful zipper!

Do not worry, we will fix this bad boy later - I wanted my zipper centered, so I have this little gap on both sides.

Step Four
-Once you have installed the zipper, open up the zipper half way. What we are going to do is sew around the entire outside of the blanket, and then flip it out so the "right" side will be outside, and your ugly seam will be hidden from the world. If you do not unzip your zipper halfway, you will sew your beautiful dog bed all the way closed and have to try to unzip it from the outside. Trust me, NOT FUN.

Step Five
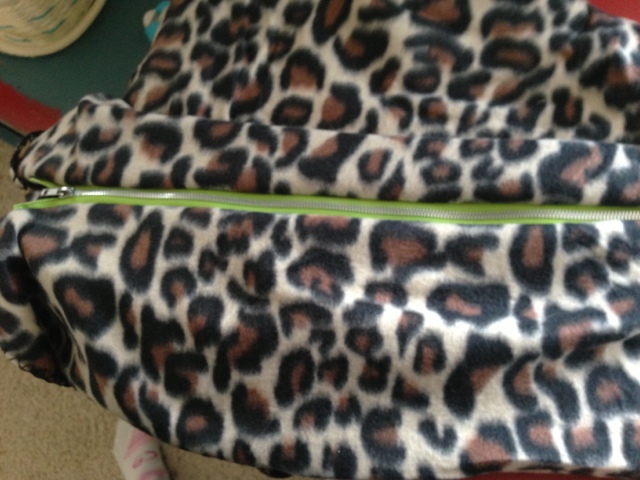
-Time to sew around the outside (marked with washi tape) the left side is folded so we only have to sew a little bit.The folded fabric should have the right sides facing the inside, and the wrong sides should be on the outside (what you see.) Same thing with the zipper, the wrong side of the zipper should be on the outside, the right side on the inside. Sew around the outside at whatever seam allowance you want, I picked an inch because of the fleece fabric, and since it will be a pet bed, I want it to be hardy for my dogs. If you're using flannel, I'd recommend an inch seam allowance as well.

Step Six
-Don't forget to do that baby part on the opposite side of the zipper. Just sew it at the same seam allowance you used for your zipper. I used washi tape to mark how much length I had to sew.

Here is what the bed looks like when you sew around the outside. Once you've sewn the bed closed, turn it inside out.

Step Seven
-Insert three pillows and zip that bad boy closed. You're done, you have a cute dog bed for the price of 3!


Happy Valentine's Day Smokey, don't you look so happy!

I applique stitched a heart on it to add some pizazz to the bed. Petey seems to dig it! It turns out to be a pretty big dog bed!