I decided to make the leap, and only had about 1.5 yards of fabric, but I did it! I made my first dress.
Here is the first one I made...in 40 minutes! Seriously. Severina is my witness, I cranked this bad boy out!

After my first attempt, and realizing that it wasn't an epic fail. I wanted to try something a little more difficult, and decided to make a tutorial while I sewed it.
Easy DIY Dress, No Pattern! In 40 minutes! : )

Supplies Needed:
-*1.5 yards of heavy jersey knit fabric (the heavier, the better!)
-*1 yard of lace (if you want to make a lace one like my dress)
-Coordinating thread
-Measuring tape
-Pins
-Good Scissors
-Sewing Machine
-Optional - Hug snug
*Supplies are based on my 5'3ish frame

-Find your dress! Look for a dress with simple lines, not very many seams, and no zipper! We are making a dress out of jersey material, that should be very easy to pull over your head.
-This is a simple dress that I've had forever, it's just a basic Roxy one with a very high waist. I replicated this dress exactly in the floral print, but decided to make it a little more low waisted for my lace dress.

Step 2A: Plan and cut out the bottom part of your dress (I will call this the skirt for the rest of the tutorial)
-I folded the top of the dress down, and cut 1 inch around the entire outside
-Follow the natural seams of the skirt
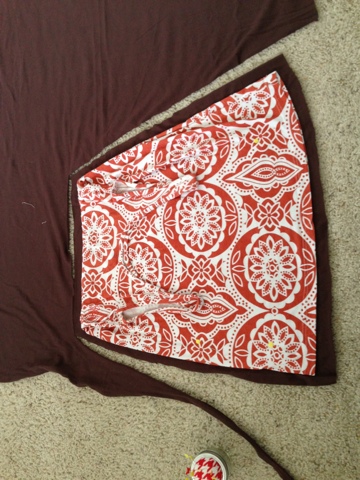
-I always cut one piece from the "pattern" and then cut the second piece from the piece I already cut out, I do not like to work with lots of fabric when it comes to cutting, so this is my way of not letting the jersey knit get to me.

-I laid the dress top on the fabric and cut 1 inch around the entire top piece
-How long you want your dress top to be is up to you. You may be happy with an empire waist, or a lower waist, just measure yourself and give it a shot. You can always make things shorter, but NOT longer. Remember that!

-Fixing your dress top
-If you tend to cut fabric like me and Helen Keller, you'll have jagged lines. As you can see in this picture, my sides are uneven, and I wanted to fix this.

-Fold over your top in half, and cut around the sides to even out your top
-Remember, fabric moves, and shifts, and you'll never get two perfect anythings, ever!

-Cut another top from the one you already created. You should have two tops and two bottoms by now


Step Six: Lace
-Technically the brown part of this dress was my lining, pin your skirt lining to the lace, and cut out two skirt pieces of lace
-You don't need the lace if you don't want it, you can skip all the lace steps if you want to : )


Step 7 - Option A
-I took a sewing class once, and made a custom fitted skirt, and my teacher raved about hug snug. We used it for the hems in our skirts, but I have something outrageous like 300 yards of it, so I've been using it randomly on other projects.
-If you want to, and you definitely don't have to, but I used it to create a more finished looking seam on my top. I only did this on the brown dress, the cute floral jersey one doesn't have this at all. I was merely experimenting, but you can see how I constructed my top with this hug snug
- I found that the top laid flatter with the hug snug, but honestly, unless you plan on making a ton of dresses, I'd totally skip the hug snug!

-Fold over your fabric 1/4" and zig zag stitch around the neck of the top and the sleeves, but NOT down the sides
-Do this for the 2 tops

-You should now have two tops with beautiful seams on the sides of the sleeves and the neck
-Let's sew the straps of the dress together at the top
-With the RIGHT sides facing each other, sew a straight line across the straps, cut off the extra material


Cut off those extra pieces at the top!

You should now have an adult bib, with the sides open

Step 9: Side seams
-With the right sides of the top facing each other, sew a 1/4" seam down the sides of the top
-You should continue down near the armpit/sleeve of the dress until the bottom
-You can do this a few times to get the look that you want, if you want a more fitted look, sew at an angle slightly going in towards the bottom

You should have a glorified crop top now!

Step 10 - Attaching the lace to the lining
-Pin the lining to the lace
-Sew down the sides of the skirt on both sides to attach the lace to the lining (this just made everything so much easier to work with! Instead of having 6 pieces of fabric floating around, I only had 2.)
- I sewed about a .5" seam using a straight stitch, you'll see why I did smaller than an inch later

You should have two exact replicas

Step 11: Sewing the skirt piece together
-Lay the two right sides of the skirt together, and sew one seam down each side with about a 1" seam (This will cover up that .5" seam that we did early.)
-Cut off any extra fabric or else it will bunch up at your hips
-Make sure your thread is the color of the lace so it doesn't show up on your pretty lace!

Sewing past the .5" seam from earlier

-You should have one top now, and one skirt. We need to combine them!
-This is going to be extremely hard to explain, but it's SO easy to do! If you've ever made any sort of tote bag, you need to assemble this dress like you assemble a bag with lining.
-Turn both garments inside out
-Put the inside of the top into the bottom of the skirt - so the seams should touch around the top
-Sew a .5" seam around the top of the shirt/bottom of the dress
-I pinned the top and the skirt at the each of the sides, so that I knew the dress would line up properly, and then just sewed in an entire loop

Turn that bad boy inside out, slap on a belt, and you have yourself a super easy, custom made dress!

Just a random up close picture of the hem on this dress. I'm 99% sure that this dress is made out of lace that is supposed to be for a tablecloth...

Please let me know if anything doesn't make sense. I'd be happy to help anyone because this dress was ridiculously easy and cheap! : )
Very nicely done! I love making easy dresses too.
ReplyDeleteThank you so much! : )
DeleteYou are hilarious!! I absolutely will be using this little tutorial this weekend as I embark on my first dress-making-shinnannigans. (I, too, am a "dress girl", but not girly...I look forward to being able to easily get dressed without hassle. Huzzah!)
ReplyDeletePlease let me know how it went! I know my tutorials aren't good like a lot of them on the web, but they're realistic!
DeleteLet me just say that before you read this please don't think I am a weirdo.
ReplyDeleteI have read a little bit of all of your posts and creeped all over your Instagram pictures and I feel like you and I could be the very best of friends. You have inspired me to get back into sewing. I am in Grad school and I have put my beloved hobby on the back burner. We also have the same sewing machine might I add, which mine also sits on top of an old sewing machine table. You can read a little bit more about me, i promise im not all that interesting, but I am a reservist wife (please don't shun me) and my husband is in limbo with his career. ANYWAYS, what I am getting at is that if my husband ever does go active duty I hope our paths cross, because you seem like a pretty cool gal.
Hopefully I have not totally creeped you out! Have a lovely day!
This post made my day! I am sorry it has taken me so long to respond to you! I hope that your husband becomes active and gets stationed one day near mine! : ) Then we can be friends who sew together : )
DeleteI went over your instructions several times. Yes, you can teach! I also make outfits out of so-called fabrics such as tablecloths, pillowcases. sheets, etc. I avoid hems and with my pillowcase skirt, side seams. I enjoyed your website! Where do you buy hug snug? I believe it is necessary for knit fabrics.. YOU CAN SEW! Thanks for sharing!
DeleteThank you so much!
DeleteHere is the link to Hug Snug!
http://www.amazon.com/100yds-Schiff-Binding-Eggshell-001/dp/B001UYICO6
Bonito blog, gracias por compartir, me gusta. pvc rain jacket
ReplyDeleteI absolutely Loved this and will be trying it :-)
ReplyDelete~Azier-'di
Hi came across your fantastic instruction by chance !! however soooo impressed my Granddaughter needs some easy inspiration and you'll do the trick - just love your approach and ideas - its perfect for her - thank you so much. I did something very similar over fifty years ago - life goes full circle as they say.
ReplyDeleteThank you so much for this tutorial!! I had put my sewing machine away but I am now inspired to sew!! I love dresses, but being only 5'2" I have difficulty finding the perfect fit. You have made this sound so easy - I have to give it a go ....... Brilliant :)
ReplyDeleteI have not sewed since I was a little girl, gathering up my Mom & Grandma's cut-aways and creating un-even hemmed skirts - I was laughed at back then but would have been cutting edge just a couple of decades later ;-) Being short and rubansque I always thought I should sew my own creations & now I will! Your little post has reminded me how not-so-scary and, very gratifying, sewing can be. Thank you.
ReplyDelete